Documentation version: if you are reading this online but you have installed EasyCV on your computer, switch to your local documentation as soon as possible. Just click on "Documentation" in your EasyCV Control Center (see below). The version of the local documentation matches your installed EasyCV version. The online documentation refers to the EasyCV master branch. Documentation for older versions is available from EasyCV version 0.8 onwards and it is included with the binary installer. You can also build the documentation from the source distribution.
Quickstart
Double-click the EasyComputerVision application and wait for the EasyCV Control Center to appear. This might take up to a minute the first time you start it.
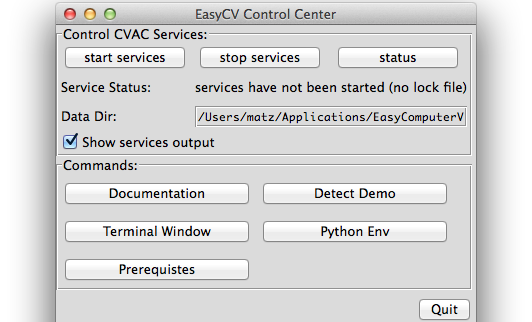
Click the "start services" button. If you get firewall warnings, select "Allow" so the services can accept the client's service requests in the next step. On Windows, several windows will pop up. You can minimize them, but don't close them.
Click the "Detect Demo" button. This will run a standard face detector on a sample image and print the results. If you have PIL installed it will also pop up a window showing you the result. Done!
Run custom "easy" code in a Python shell
Click the "Terminal Window" button. This sets the environment variables necessary to run client code for this specific window only. Once the window has opened, change the current directory to the root installation folder, such as
cd /Applications/EasyComputerVision.app/Contents/Resourcesorcd C:\Program Files\EasyComputerVisionorcd C:\CVAC\CVAC_binary-0.8.99-Win7Start an interactive Python shell by typing
python. At the >>> prompt, enter:
import easy
detector = easy.getDetector( "OpenCVCascadeDetector" )
modelfile = "detectors/haarcascade_frontalface_alt.xml"
results = easy.detect( detector, modelfile, "testImg/weltmeister.jpg" )
easy.printResults(results)
Apply the detector to your own image files
The algorithm services can only access images that are at or below the "Data Dir" path that's shown in the Control Center (mouse-over and scroll for the complete path). You can either manually copy your images to that path, or you can use the FileServer service to accomplish this task for you. Again, in the Python shell, execute the following code, replacing "testImg" with a path to your images or image folder:
import easy
rs = easy.createRunSet( "testImg" )
easy.printRunSetInfo( rs, printLabels=True )
fileserver = easy.getFileServer( "PythonFileService:default -p 10111 " )
putResult = easy.putAllFiles( fileserver, rs )
detector = easy.getDetector( "BOW_Detector" )
modelfile = "detectors/bowUSKOCA.zip"
results = easy.detect( detector, modelfile, rs )
rmResult = easy.deleteAllFiles( fileserver, putResult )
easy.printResults(results)
Further Tutorials and Demos
Please refer to the list of demos for additional tasks such as training a detector for your particular objects of interest, using LabelMe or VATIC annotations, running against remote services, creating ROC curves, or comparing algorithm performance. If something is not working as expected, check the Troubleshooting page. For more documentation, see also the links on the main page.
Architecture
EasyCV is a multi-process client-server architecture. Your Easy! code runs as client and connects to algorithm services.
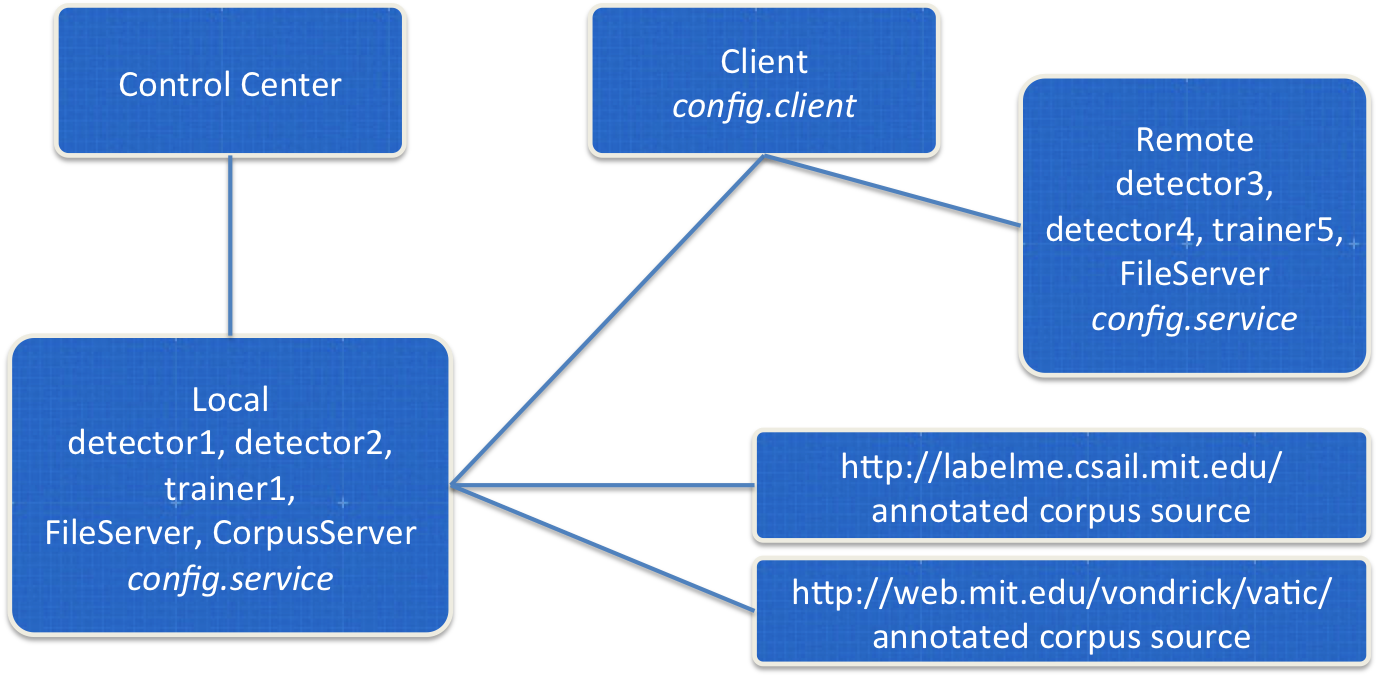
Pressing the "start" button will run a few default CV algorithms (services) locally, including detectors, trainers for detectors, a file server and a corpus server.
Take note of the service's "data" directory. That's where media files need to be located in order to be accessible to the services. If you have them in another machine, you need to "upload" them to the FileServer first. If you would like to change this folder, you need to edit the config.services file in the Application's directory.
The "data" directory is specified with the CVAC.DataDir property in both the config.client and config.service files. For local clients and services, it is convenient to make this the same directory.
Take a look at the underlying easy.py library implementation if you want to see the CVAC metadata structure and observe bare-bones interaction between clients and services.
BagOfWordsUSKOCA is specified in config.client as a service running
locally, listening on port 10104. This must correspond to the port
number specified in config.service. This particular service is a
pre-trained detector. The learned model for US, Korean, and Canadian
flags is stored in the file specified with
BagOfWordsUSKOCA.DetectorFilename = bowUSKOCA.zip.
Stop the services in your EasyCV Control Center.
Service Scripts
You can start and stop the local services without the EasyCV Control Center graphical user interface. The startServices and stopServices scripts are provided in the application's directory. That is:
On the MAC:
/Applications/EasyComputerVision.app/Contents/Resources/bin/startServices.sh
/Applications/EasyComputerVision.app/Contents/Resources/bin/stopServices.sh
On Windows:
C:\EasyCV\CVAC_binary-0.X.XX-Win7\bin\startServices.bat
C:\EasyCV\CVAC_binary-0.X.XX-Win7\bin\stopServices.bat
C/C++ Interfaces
If the Easy! library and Python are not your thing, you can also run one of the C/C++ examples and, for example, test files in a directory "data/CTest" with one of the algorithms:
bin/detectorClient BagOfWordsUSKOCA CTest config.client
bin/detectorClient NpsBagOfWordsUSKOCA CTest config.client
NpsBagOfWordsUSKOCA is specified in config.client as a service running on vision.nps.edu, listening on port 10104. This is a service with the same pre-trained detector, so you should get the same results as above. This time, however, the processing happens on the remote server.